Hi, and welcome to a rather interesting lecture, where we talk about web application cyber security and how to apply/control AWS managed rules in a safe and efficient way. As we already mentioned at the previous lecture we can’t simply turn on managed rules and to be happy because of false positives. To resolve the problem we need to use count mode. Let me introduce small part for AWS documentation.
Count – AWS WAF counts the request but does not determine whether to allow it or block it. This is a non-terminating action. AWS WAF continues processing the remaining rules in the web ACL. In rules that you define, you can insert custom headers into the request and you can add labels that other rules can match against.
And that is where we have to start from. We need to turn on count action for all chosen by us AWS WAF managed groups and rules inside them, and wait 1-2 weeks to gather WAF log’s data basing on which would be able to take further decisions. It is really easy to do using terraform. You may find all ready working code at my course, here I will represent only main idea and the most essential terrafom parts. Let’s start from variables
# variables.tf
....
variable "managed_rules" {
  type = list(object({
    name           = string
    priority       = number
    version        = string
    limit          = number
    excluded_rules = list(string)
    blocking_rules = list(string)
  }))

  description = "List of AWS Managed WAFv2 rules"

  default = [
    {
      name           = "AWSManagedRulesAmazonIpReputationList"
      priority       = 6
      version        = null
      limit          = 1
      excluded_rules = []
      blocking_rules = [
        "AWSManagedIPReputationList",
        "AWSManagedReconnaissanceList",
        "AWSManagedIPDDoSList"
      ]
    },
    {
      name           = "AWSManagedRulesCommonRuleSet"
      priority       = 7
      version        = "Version_1.10"
      limit          = 1
      excluded_rules = [
        "NoUserAgent_HEADER",
        "UserAgent_BadBots_HEADER",
        "SizeRestrictions_BODY",
      ]
      blocking_rules = [
        "SizeRestrictions_URIPATH",
        "GenericLFI_URIPATH",
        "SizeRestrictions_QUERYSTRING",
        "SizeRestrictions_Cookie_HEADER",
        "EC2MetaDataSSRF_BODY",
        "EC2MetaDataSSRF_COOKIE",
        "EC2MetaDataSSRF_URIPATH",
        "EC2MetaDataSSRF_QUERYARGUMENTS",
        "GenericLFI_QUERYARGUMENTS",
        "GenericLFI_BODY",
        "RestrictedExtensions_URIPATH",
        "RestrictedExtensions_QUERYARGUMENTS",
        "GenericRFI_QUERYARGUMENTS",
        "GenericRFI_BODY",
        "GenericRFI_URIPATH",
        "CrossSiteScripting_COOKIE",
        "CrossSiteScripting_QUERYARGUMENTS",
        "CrossSiteScripting_BODY",
        "CrossSiteScripting_URIPATH"
      ]
    },
    {
      name           = "AWSManagedRulesLinuxRuleSet"
      priority       = 8
      version        = "Version_2.2"
      limit          = 1
      excluded_rules = []
      blocking_rules = [
        "LFI_URIPATH",
        "LFI_QUERYSTRING",
        "LFI_HEADER"
      ]
    },
    {
      name           = "AWSManagedRulesSQLiRuleSet"
      priority       = 9
      version        = "Version_1.1"
      limit          = 1
      excluded_rules = [
        "SQLi_COOKIE"
      ]
      blocking_rules = [
        "SQLiExtendedPatterns_QUERYARGUMENTS",
        "SQLi_QUERYARGUMENTS",
        "SQLi_BODY",
        "SQLi_URIPATH"
      ]
    }
  ]
}
....
So, managed_rules is a list of managed groups I am going to use. Every group has the same configuration. Let’s examine the common rule set to understand what we have here and how to use it. So, at first we have to provide a group name, then there are priority and version properties, which are essential parts of configuration. I will tell about it more in detail at further articles.
The most essential thing which you have to understand now are excluded and blocking rules. In case we put the rule name to the excluded list – it means that it would be applied at count mode. In case the rule would be placed at the blocked array part – then it would be applied with block action. Now, let me show you the terraform logic related with AWS managed rules.
# waf.tf
....
dynamic "rule" {
    for_each = var.managed_rules

    content {
        name     = rule.value.name
        priority = rule.value.priority
      }

      statement {
        managed_rule_group_statement {
          name        = rule.value.name
          version     = rule.value.version
          vendor_name = "AWS"

          dynamic "rule_action_override" {
            for_each = rule.value.blocking_rules
            content {
              name = rule_action_override.value
              action_to_use {
                block {}
              }
            }
          }

          dynamic "rule_action_override" {
            for_each = rule.value.excluded_rules
            content {
              name = rule_action_override.value
              action_to_use {
                count {}
              }
            }
          }
        }
      }

      visibility_config {
        cloudwatch_metrics_enabled = true
        metric_name                = rule.value.name
        sampled_requests_enabled   = true
      }
    }
  }

  visibility_config {
    cloudwatch_metrics_enabled = true
    sampled_requests_enabled   = true
    metric_name                = "${local.name_prefix}-webacl"
  }

  tags = local.common_tags
}
....
So, here we are having a dynamic terraform block, where we are looping over every AWS WAF managed group from variables we have just examined. For every group we are setting its name, priority, and there is also one more inner loop over its rules. In case we place a rule at blocking_rules list – it would be applied with blocked action. Otherwise, in case it is added to excluded list – count action would be used. So, we can easily switch all rules at count mode by adding every rule to the excluded list.
That is the 1st step of WAF adjustment for AWS managed rules, which I recommend to do. In such a state, all network traffic is passing over WAF to our application. Despite WAF not applying any rules at blocking or allowing requests, it still provides according evaluation. What is even more essential for us, is that current information is recorded as logs at AWS S3. Though it will happen only if we will inform AWS WAF about it:)
# waf.tf
...
resource "aws_s3_bucket" "waf_logs" {
  bucket = "aws-waf-logs-${local.name_prefix}-apps"

  acl = "private"

  lifecycle_rule {
    id      = "delete"
    enabled = true

    expiration {
      days = 30
    }
  }

  force_destroy = false
  tags          = local.common_tags

  server_side_encryption_configuration {
    rule {
      apply_server_side_encryption_by_default {
        sse_algorithm = "AES256"
      }
    }
  }
}

resource "aws_wafv2_web_acl_logging_configuration" "log_configuration" {
  log_destination_configs = [aws_s3_bucket.waf_logs.arn]
  resource_arn            = aws_wafv2_web_acl.aws_managed_webacl.arn
}
...
Now, we can do something interesting. We may generate some traffic over some test web application hidden behind WAF artificially. At my course I am showing how to create and deploy Python Flask Application at AWS using EC2 autoscaling group, ALB and WAF. As you understand I can’t describe how to do it in several words using one article 🙂 But here is architecture diagram that will help you to understand situation better
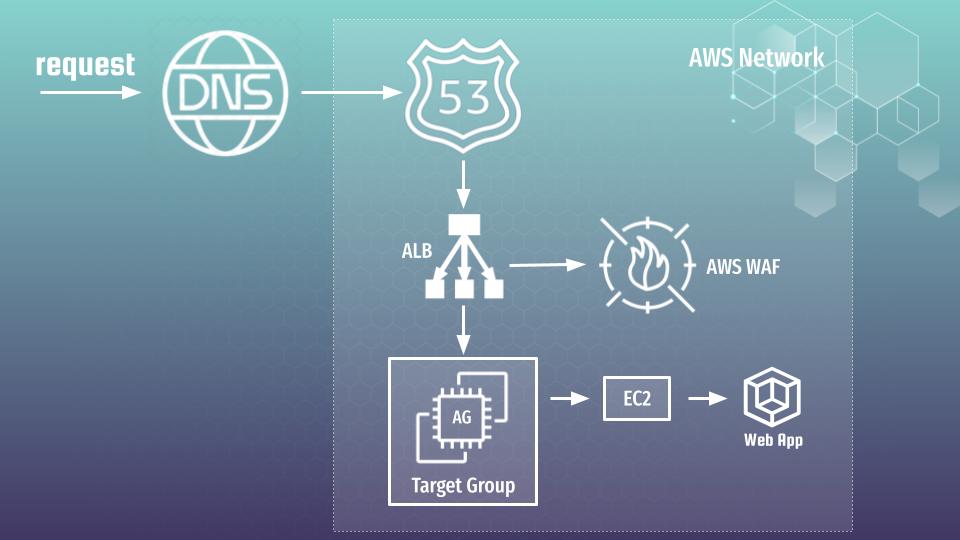
So, lets simply imagine that you already have such an application with that one or similar architecture. Let’s also assume that current application is available under url: “flask.testapp.website”. Now we can use next bash script to generate some artificial traffic
curl https://flask.testapp.website/test?parameter=0
curl https://flask.testapp.website/test?parameter=1
curl https://flask.testapp.website/test?parameter=2
curl https://flask.testapp.website/test?parameter=3
curl https://flask.testapp.website/test?parameter=4
curl https://flask.testapp.website/test?parameter=5
curl https://flask.testapp.website/.env
curl https://flask.testapp.website/env/.env
curl https://flask.testapp.website/.environment
curl https://flask.testapp.website/.env.%7B%7BDN%7D%7D
curl https://flask.testapp.website/.aws/credentials
curl https://flask.testapp.website?page=../../../../../../../../../../etc/passwd
curl https://flask.testapp.website/download?working_dir=%2F..%2F..%2F..%2F..%2F..%2F..%2F..%2F..%2F..%2F..%2Fetc%2F&type&file=passwd
curl https://flask.testapp.website//install/index.php.bak
curl https://flask.testapp.website/test?parameter=a=%3Cscript%3Ealert%28%22XSS%22%29%3B%3C%2Fscript%3E&b=UNION+SELECT+ALL+FROM+information_schema+AND+%27+or+SLEEP%285%29+or+%27&c=..%2F..%2F..%2F..%2Fetc%2Fpasswd
curl https://flask.testapp.website?page_on=20&page_nr=1&sort=off&sort_order=asc%27%29+AND+1%3D1+UNION+ALL+SELECT+1%2CNULL%2C%27%3Cscript%3Ealert%28%22XSS%22%29%3C%2Fscript%3E%27%2Ctable_name+FROM+information_schema.tables+WHERE+2%3E1--%2F%2A%2A%2F%3B+EXEC+xp_cmdshell%28%27cat+..%2F..%2F..%2Fetc%2Fpasswd%27%29%23
That is one of examples from my course. First five urls are working API, which imitates different app behavior. Rest of requests – are malicious one, that represent a classical hacker’s attempts of:
- configuration files scans, which can appear to be open because of admin negligence
- XSS attacks
- SQL injection
So, let’s assume we have run script above several times to generate artificial traffic. In that case all those requests will pass via AWS WAF, moreover there are detailed logs about how every request was parsed according to existing firewall rules and how it was finally processed. The next thing we have to do is to analyse according information. Let’s me show you how to do it at the next article.
If you are not ready to wait, or prefer to pass all material in a fast and more convenient way – then welcome to my course, were you can pass all material in a fast and convenient way. Here you can find coupon with discount, which I am updating regularly in the middle of every month.