Hi, devops fans
Before to start be sure that you have installed and configured next things:
- AWS account
- aws-cli – if you don’t have it – please follow official documentation to install it according to your’s operational system
- configure AWS profile – if you still don’t know what AWS profile means and how to configure it – then, follow the instructions within that article and configure AWS profile using your AWS account credentials.
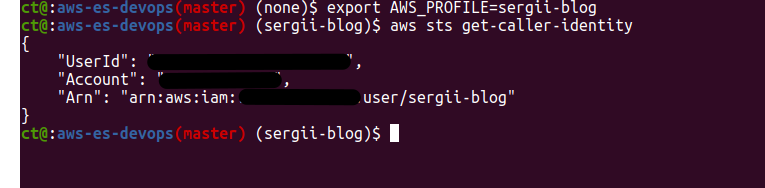
It is also good to display AWS profile at your bash prompt – to be sure which AWS account you are working on. Here you can see that I have a branch name master and then a profile name – “sergii-blog“. To verify that all works properly – you may run “aws sts get-caller-identity” – that should display information about your account and AWS user – something like that:
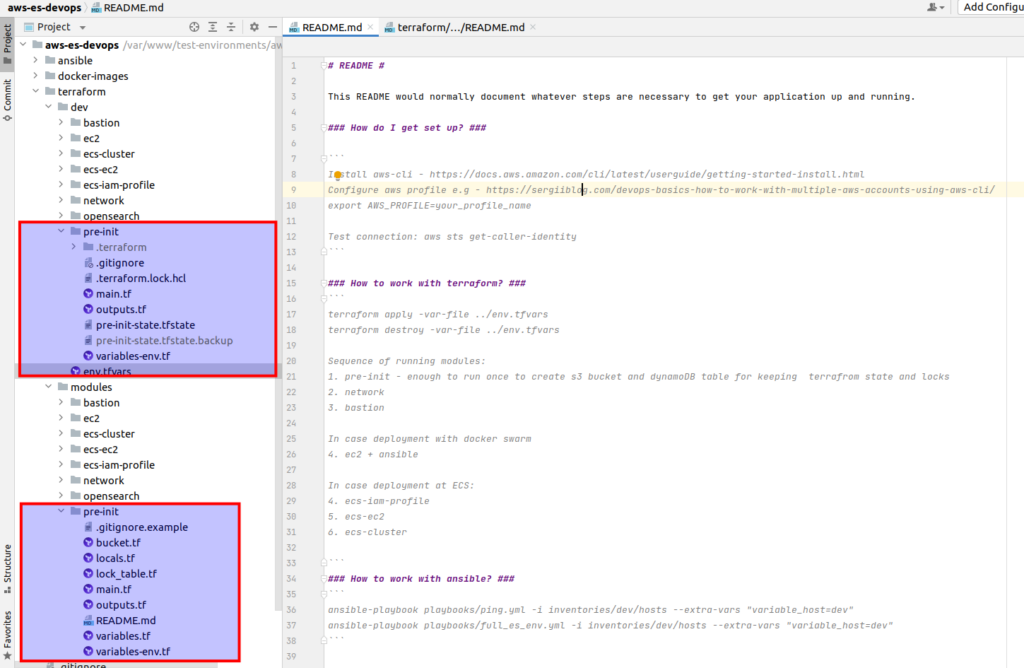
Below is the repository code structure. At that article we will concentrate at pre-init terraform module and it’s implementation. (P.S. remember that you can download all code at once while being enrolled at my udemy course)
Now time to speak about terraform versions. I will be using 1.2 terrafom version – please use it also – that will guarantee that all scripts would be working properly. In case you already have other version – you can resolve the problem by having multiple versions of terraform at one PC using, e.g, tfenv tool- here is the article about how to manage multiple terrafom versions at one PC
Ok, suppose now we are ready to concentrate around pre-nit terraform module. That module will allow us to create an s3 bucket for keeping terraform state and dynamoDB for keeping locks. Let’s first try to understand why we need it:
What is terraform state?
- The state is a kind of a snapshot of the architecture. Terraform needs to know what was provisioned, what are the resources that were created, track the changes, etc.
- All that information is written either to a local file terraform.state or to a remote location. Generally the code is shared between members of a team, therefore keeping local state file is never a good idea. We want to keep the state in a remote destination. When working with AWS, this destination is s3
Why Terraform State Locking is important?
- When you work on large infrastructure provisioning with Terraform then it is always more than one developer working on the same terraform project.
- We can not guarantee that incremental updates on terraform state files will be performed one after another. Any developer can update and push terraform state file at any point in time, so there should be some provision to prevent a developer from writing or updating terraform file when it is already being used by another developer.
- Locking prevents Terraform state file(terraform.tfstate) from accidental updates by putting a lock on file so that the current update can be finished before processing the new change. The feature of Terraform state locking is supported by AWS S3 and Dynamo DB.
So now when we understand theory – let’s skip to practice. Let’s pass over implementation at first – within all files at terraform/dev/pre-init folder (you may look at screen with code repository structure above) . Lets start from “terraform/dev/pre-init/main.tf“:
terraform {
  backend "local" {
    path = "./pre-init-state.tfstate"
  }
}

provider "aws" {
  allowed_account_ids = [var.account_id]
  region              = var.region
}

module "pre_init" {
  source = "../../modules/pre-init"

  account_id = var.account_id
  env        = var.env
  project    = var.project
  region     = var.region

  bucket_name = "terraform-state-aws-es-devops"
  table_name  = "terraform-state-aws-es-devops"
}
First of all, please, pay attention that for that module we are going to use local state. That is the only one case when we are going to use local backend. All other modules will use only S3 remote backend, that would be created after running pre-init terraform module. As result we want to preserve according terraform information (state of pre-init module results) at our code repository. So we announce our intent at .gitignore:
!*.tfstateThen we have terraform/dev/pre-init/outputs.tf. We want to output the name of S3 bucket and the name of DynamoDB table that would be created by pre-init terraform module:
output "state_bucket" {
  value = module.pre_init.state_bucket
}

output "lock_table" {
  value = module.pre_init.lock_table
}
And in the end we need to define variables related to our AWS account and project – terraform/dev/pre-init/variables-env.tf:
variable "account_id" {
  type        = string
  description = "AWS Account ID"
}

variable "env" {
  type        = string
  description = "Environment name"
}

variable "project" {
  type        = string
  description = "Project name"
}

variable "region" {
  type        = string
  description = "AWS Region"
}
Ok, that is all related to realization. All other files/folders:
- terraform/dev/pre-init/.terraform,
- terraform/dev/pre-init/pre-init-state.tfstate,
- terraform/dev/pre-init/pre-init-state.tfstate.backup
will appear after applying pre-nit terraform module. Now let’s invistigate the files from terraform module by itself. Lets start from terraform/modules/pre-init/main.tf. Here we declare AWS provider and fix required terraform version:
terraform {
  required_providers {
    aws = {
      source  = "hashicorp/aws"
      version = "~> 4.16"
    }
  }

  required_version = "~> 1.2"
}
Then there is a small definition of common tags at terraform/modules/pre-init/locals.tf:
locals {
  common_tags = {
    Env       = var.env
    ManagedBy = "pre-init"
    Project   = var.project
  }
}
Then we define our module variables at terraform/modules/pre-init/variables.tf:
variable "bucket_name" {
  type        = string
  description = "State bucket for the environment being created"
}

variable "table_name" {
  type        = string
  description = "Terraform local table name"
}
And at env variables we keep things related to our environment and project – terraform/modules/pre-init/variables-env.tf:
variable "account_id" {
  type        = string
  description = "AWS Account ID"
}

variable "env" {
  type        = string
  description = "Environment name"
}

variable "project" {
  type        = string
  description = "Project name"
}

variable "region" {
  type        = string
  description = "AWS Region"
}
Finally we can move to main logic. Below is terraform/modules/pre-init/bucket.tf part, where we use “aws_s3_bucket” terraform resource to create s3 bucket, then we assign to our bucket encryption and versioning.
resource "aws_s3_bucket" "state" {
  bucket = var.bucket_name

  tags = local.common_tags
}

resource "aws_s3_bucket_server_side_encryption_configuration" "state" {
  bucket = aws_s3_bucket.state.bucket

  rule {
    apply_server_side_encryption_by_default {
      sse_algorithm = "AES256"
    }
  }
}

resource "aws_s3_bucket_versioning" "state" {
  bucket = aws_s3_bucket.state.bucket

  versioning_configuration {
    status = "Enabled"
  }
}
And, here is the terraform/modules/pre-init/lock_table.tf, where we create DynamoDB table for keeping terraform locks:
resource "aws_dynamodb_table" "lock" {
  name         = var.table_name
  billing_mode = "PAY_PER_REQUEST"
  hash_key     = "LockID"

  server_side_encryption {
    enabled = true
  }

  attribute {
    name = "LockID"
    type = "S"
  }

  tags = local.common_tags
}
And that’s all. Now we can apply our module. Let’s go to the terraform/dev/pre-init and run:
terraform apply -var-file ../env.tfvarsHere is how terraform/dev/env.tfvars looks like in my case:
account_id = "xxxxxxxxxxx"  # put here your real AWS account id
env        = "dev"
project    = "aws-es-devops"
region     = "eu-central-1"
After applying terraform module you will get s3 bucket for keeping terraform state and dynamoDB for keeping locks. We will use both for all other terrafrom modules. At next articles will create some base AWS skeleton configuration that would be used for deploying high available OpenSearch cluster. If you are interested at theme: “How to deploy high available OpenSearch cluster at AWS using terraform” – then you may subscribe to my newsletter. Alternatively, you may pass all material at once in convenient and fast way at my on-line course at udemy. Below is the link to the course. As the reader of that blog you are also getting possibility to use coupon for the best possible low price.