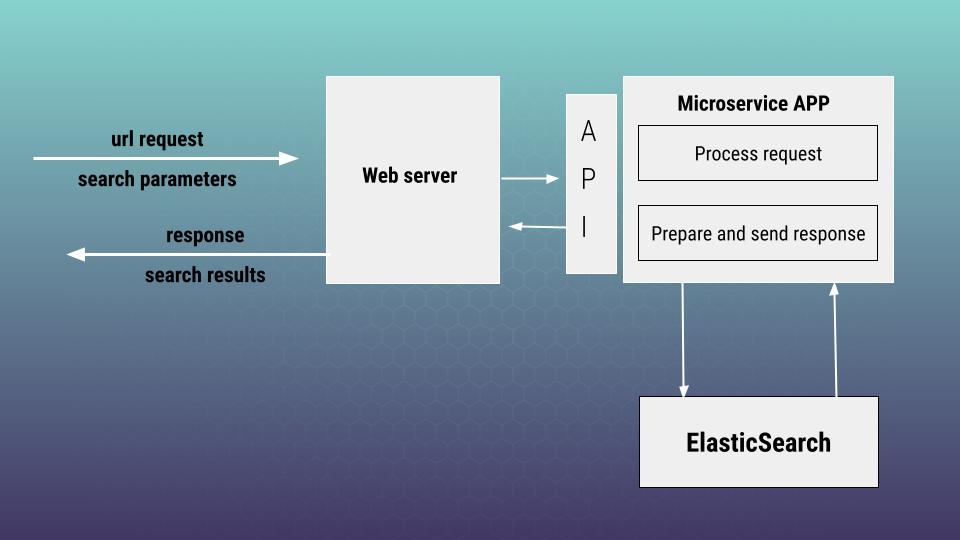
Hi, and welcome to the second article devoted to the theme: “How to work with ElasticSearch using Java Spring Boot”. Here we will prepare our local environment for further development. As you remember from the Part 1 we have to create a web server, microservice application and elasticsearch as standalone docker containers. Before you start, you need to have Java and gradle installed at your environment.
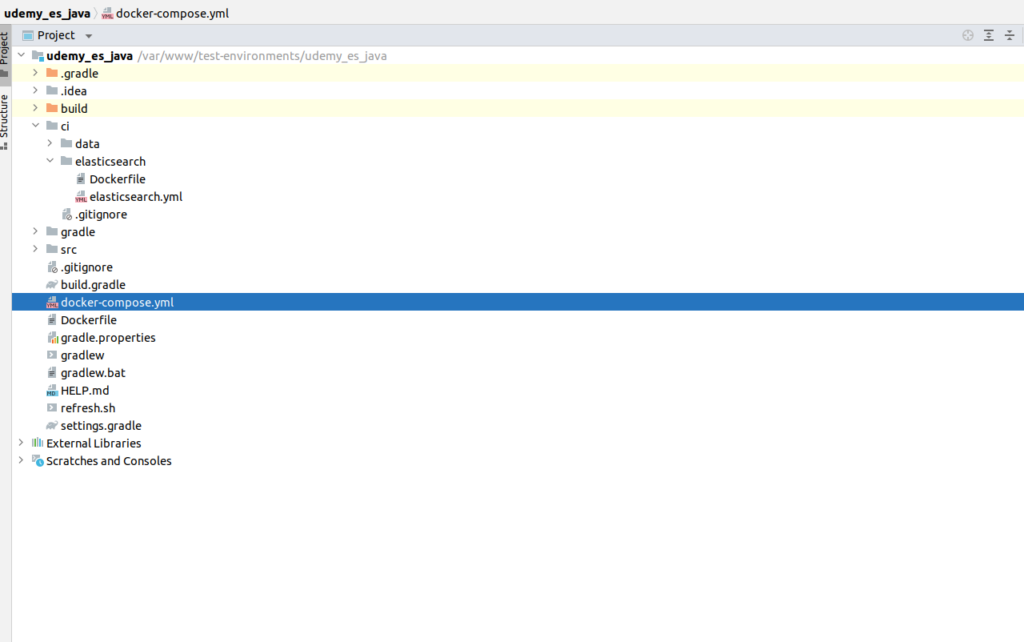
Below is docker compose file that will help us to realize environment represented at scheme above. I am also adding the screen of physical project file structure in order it would be clear how according files are organized.
# docker-compose.yml

version: '3'

services:
  udemy_java_es:
    network_mode: "host"
    container_name: "udemy_java_es"
    image: springio/spring-boot-es-udemy
    restart: always
    depends_on:
      - udemy_javaes_elasticsearch
    ports:
      - "8080:8080"
    expose:
      - 8080

  udemy_javaes_elasticsearch:
    build: ./ci/elasticsearch
    network_mode: "host"
    environment:
      -  discovery.type=single-node
      - "ES_JAVA_OPTS=-Xms512m -Xmx512m"
    container_name: "udemy_javaes_elasticsearch"
    volumes:
      - ./ci/data/es/db:/usr/share/elasticsearch/data
      - ./ci/data/es/logs:/usr/share/elasticsearch/logs
      - ./ci/data/es/repo:/usr/share/elasticsearch/repo
    ports:
      - "9200:9200"
    expose:
      - "9200"
Let’s have a look inside the configuration. So first of all, we are having here spring boot application by itself. It is worth mentioning here that we don’t need to create any web server here as Tomcat web server is already built for spring boot application out of the box. Of, course you may ask where that image springio/spring-boot-es-udemy comes from? First of of all you need to build java application. I am using gradle for that purpose. And create according dependencies:
./gradlew build
 mkdir -p build/dependency && (cd build/dependency; for f in ../libs/*; do jar -xf $f; done)
After that we can build our docker image running next command:
docker build -t springio/spring-boot-es-udemy .Beow is Dockerfile that we use. Here we are using amazon corretto base image. Then we copy according dependencies from our dependency folder and finally we are running our spring boot application. If you are interesting more at how spring boot application is dockerized and why all is done at such a way – please refer to official spring boot documentation
# Dockerfile
FROM amazoncorretto:11-alpine
RUN addgroup -S spring && adduser -S spring -G spring
RUN apk add curl
USER spring:spring
ARG DEPENDENCY=build/dependency
COPY ${DEPENDENCY}/BOOT-INF/lib /app/lib
COPY ${DEPENDENCY}/META-INF /app/META-INF
COPY ${DEPENDENCY}/BOOT-INF/classes /app

ENTRYPOINT ["java","-cp","app:app/lib/*","com.udemy_sergii_java.spring_boot_es.SpringBootEsApplication"]
While working with the project you will have to build java application and docker image rather often, so I create small bash script that helps to do it fast at one shot. Here are some short explanations of how it works. First I am checking if the docker container is already running – if yes – then it is killed. Then gradle compiles our java source files which you can find at build/libs folder. Next I am recreating the dependency folder by removing old files and unpacking new jar files. After that we are building our docker application with docker build command using Docker file at root folder. And finally we run docker compose to bring up our environment. Here is how it looks finally:
# refresh.sh for fast and convenient work

#!/bin/bash

RUNNING_CONTAINER_ID=$(docker ps | grep 'spring-boot-es-udemy' | awk '{ print $1 }')
if [ ! -z "$RUNNING_CONTAINER_ID" ]
then
  docker stop $RUNNING_CONTAINER_ID
fi

./gradlew build
mkdir -p build/dependency && rm -rf build/dependency/* && (cd build/dependency; for f in ../libs/*; do jar -xf $f; done)
docker build -t springio/spring-boot-es-udemy .
docker-compose up -d --build
Please, pay attention that spring application will not start without having ES to be up. To avoid that problem I am using the restart always policy at docker compose file. That will force the container to restart after failure caused by ES connection problems. In case using docker compose at production it is better to use custom wait for scripts as it is described at official docker compose documentation. That was all around spring boot application and java. Now lets investigate ElasticSearch docker file and it’s configuration
# ci/elasticsearch/Dockerfile

FROM elasticsearch:7.13.3

COPY elasticsearch.yml /usr/share/elasticsearch/config/

RUN bin/elasticsearch-plugin install analysis-icu
# ci/elasticsearch/elasticsearch.yml
network:
host: 0.0.0.0
path:
repo: /usr/share/elasticsearch/repo
http.cors.enabled: true
http.cors.allow-origin: "*"
http.cors.allow-headers: "Authorization"
# script.inline: true
# script.indexed: trueIn the next article (“Part 3 – Spring Boot ElasticSearch – front controller and API documentation“) we will speak about package dependencies we are going to use, some project structure aspects, controller, REST API and response/request models. If you would like to pass all material more fast, then I propose you to view my on-line course at udemy where you will also find full project skeleton. Below is the link to the course. As the reader of that blog you are also getting possibility to use coupon for the best possible low price. Otherwise, please wait at next articles. Thank you for you attention.