Hi, devops fans. Finally, finally we have finished with initial configuration preparations. Now we are ready to create something really useful. At the current article we will start to examine in detail the network terraform module that will create VPC, subnets, route tables, security groups, network address translation (NAT) and internet gateways (IG).
Here is our network architecture scheme.
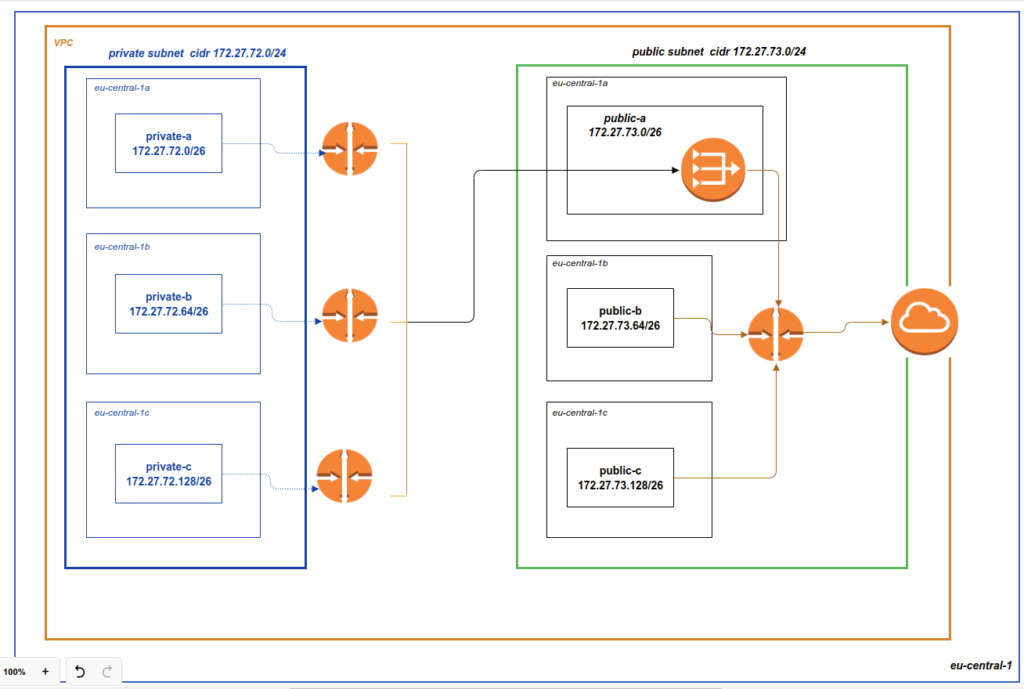
We will work at eu-central-1 region, though you can change it at terrafrom to yours favorite localization – there is no problem with that. Inside the AWS region we will create a VPC (virtual private cloud). Then we will create private subnets at every zone – a,b,c and assign every subnet to a custom route table – this will provide more control in maintaining the security of each private subnet. We will also create public subnets at every zone similar as we have it for private network. We will use Classless Inter-Domain Routing (CIDR) as it is represented at scheme. After that we will add a NAT (Network address translation) gateway that will allow us to provide internet access to components inside private subnets without directly making them publicly available. And we will also add an internet gateway. What is the life without the internet nowadays? 🙂
I also want to make an accent here again – that current skeleton is made for the purpose of learning. I plan to use it as a backbone at other articles related to different scenarios of deploying high available Elasticsearch cluster at AWS. You may use it in production – but it will require some adjustments – that is not a silver bullet for everything in the world. For example NAT gateway and private network are, probably, excessive in case using OpenSearch – though it all depends on your requirements :). Anyway, I suppose, that the current skeleton is a good point where you can start from. In most cases you will need to make only some small adjustments in order to use it at production, e.g clean code from excessive stuff or modify security groups.
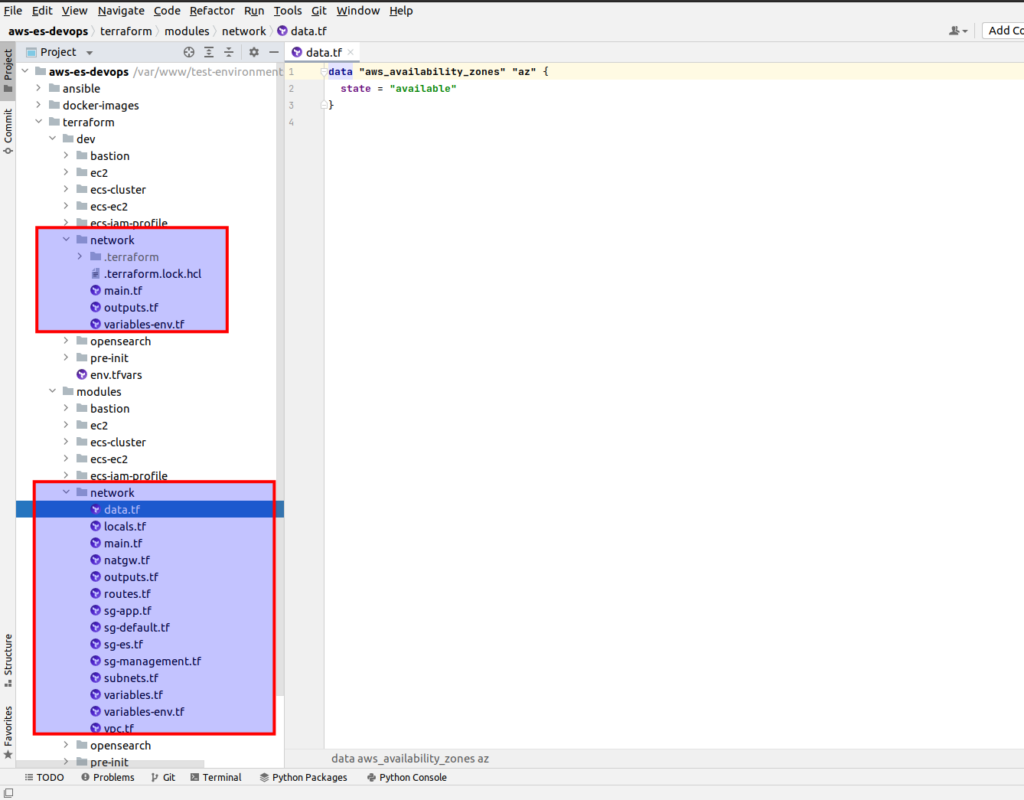
Below is the repository code structure. At that article we will concentrate at network terraform module and it’s implementation. (P.S. remember that you can download all code at once while being enrolled at my udemy course)
As it was at previous article, here I would be using terraform 1.2. Now, time to skip to terraform realization. Here is a data resource (terraform/modules/network/data.tf) – here we are registering all AWS availability zones at region – that would used at further terraform code:
data "aws_availability_zones" "az" {
  state = "available"
}
Then we have terraform/modules/network/locals.tf. Nothing specially interesting here – definition of prefix, that will allow us to identify different resources in a unique way, then we have common tags and natgw_count variable – that determines how many (Network address translation) gateways do we want to deploy:
locals {
  name_prefix = format("%s-%s", var.project, var.env)

  natgw_count = var.natgw_count == "all" ? var.az_num : (var.natgw_count == "one" ? 1 : 0)

  common_tags = {
    Env       = var.env
    ManagedBy = "terraform"
    Project   = var.project
  }
}terraform/modules/network/main.tf– as always – here we register AWS provider:
terraform {
  required_providers {
    aws = {
      source  = "hashicorp/aws"
      version = "~> 4.16"
    }
  }

  required_version = "~> 1.2"
}
Those were small details. Now let’s pass via backbone components. So at 1st terrafrom will deploy a virtual private cloud. At VPC resource (terraform/modules/network/vpc.tf) we are defining a CIDR block, we also want to enable dns support. Then we are adding our custom tags. And in the end we are having Internet Gateway:
resource "aws_vpc" "main" {
  cidr_block           = var.vpc_ip_block
  enable_dns_hostnames = true
  enable_dns_support   = true
  instance_tenancy     = "default"

  assign_generated_ipv6_cidr_block = true

  tags = merge(local.common_tags, {
    Name = local.name_prefix
  })
}

resource "aws_internet_gateway" "igw" {
  vpc_id = aws_vpc.main.id

  tags = merge(local.common_tags, {
    Name = local.name_prefix
  })
}
Now let’s go to the subnets (terraform/modules/network/subnets.tf):
resource "aws_subnet" "public" {
  count = var.az_num

  vpc_id = aws_vpc.main.id

  availability_zone = element(data.aws_availability_zones.az.names, count.index)
  cidr_block        = cidrsubnet(var.subnet_cidr_public, var.new_bits_public, count.index)
  ipv6_cidr_block   = cidrsubnet(aws_vpc.main.ipv6_cidr_block, 8, count.index)

  map_public_ip_on_launch = true

  tags = merge(local.common_tags, {
    Name = format("%s-public-%s",
    local.name_prefix,
    substr(strrev(element(data.aws_availability_zones.az.names, count.index)), 0, 1)
    )
  })
}

resource "aws_subnet" "private" {
  count = var.az_num

  vpc_id = aws_vpc.main.id

  availability_zone = element(data.aws_availability_zones.az.names, count.index)
  cidr_block        = cidrsubnet(var.subnet_cidr_private, var.new_bits_private, count.index)

  map_public_ip_on_launch = false

  tags = merge(local.common_tags, {
    Name = format("%s-private-%s",
      local.name_prefix,
      substr(strrev(element(data.aws_availability_zones.az.names, count.index)), 0, 1)
    )
  })
}
Let’s investigate public AWS subnet resource at first. So, count is the number of available zones. I am operating in Frankfurt which has 3 zones. We assign here the vpc id created at the previous step. After that we are assigning the availability zone using count index and aws_availability_zones list, created at data resource above. In such a way we palace 3 public subnets at every zone (please look at AWS network scheme picture above). Now we have to create proper addressing. For that purpose we are using cidrsubnet terraform function. If you still are not confident at network CIDR conceptions or maybe you simply want to refresh that tricky theme – then I advice to skip for documentation for a while. I really like that terraform article – it describes Netmasks and Subnets conceptions in very precise and clear way. So, thanks to cidrsubnet terraform function we are getting proper addressing according to our scheme. Then we define that current subnets have to be public and in the end we add custom tags. And good news – that private section – is completely the same – accept that we use another variable for addressing, plus in addition we set map_public_ip_on_launch to false.
Now when we are having VPC and subnets inside it having proper network addressing time to deal with routing and security groups. But let’s do it at another article. Please, check my blog regularly or simply subscribe to my newsletter. Alternatively, you may pass all material at once in convenient and fast way at my on-line course at udemy. Below is the link to the course. As the reader of that blog you are also getting possibility to use coupon for the best possible low price.