Hi, AWS fans.
At previous article we examined:
- terraform modules, related to AWS ECS Elasticsearch deployment, from higher perspective
- security issues around assume role policies
- ecs-iam-profile terraform module
At current article we will deploy ec2 instances that would be used as backbone for our ecs cluster. Let’s invistigate ecs ec2 terraform module.
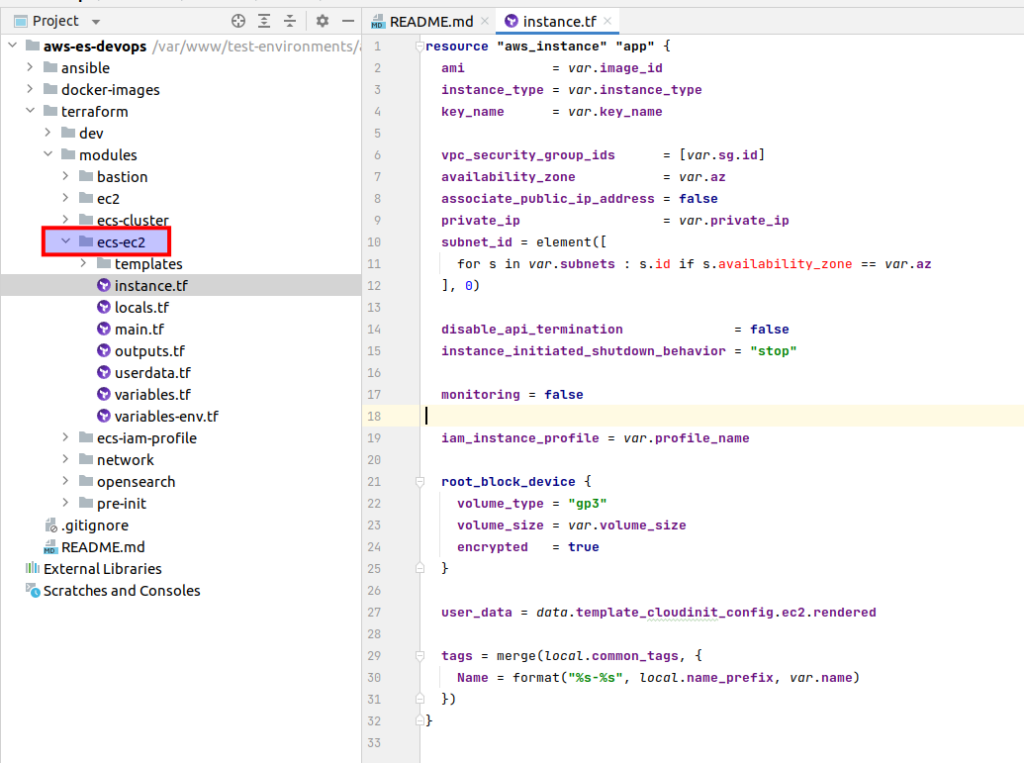
The main logic is located at the instance.tf file:
resource "aws_instance" "app" {
  ami           = var.image_id
  instance_type = var.instance_type
  key_name      = var.key_name

  vpc_security_group_ids      = [var.sg.id]
  availability_zone           = var.az
  associate_public_ip_address = false
  private_ip                  = var.private_ip
  subnet_id = element([
    for s in var.subnets : s.id if s.availability_zone == var.az
  ], 0)

  disable_api_termination              = false
  instance_initiated_shutdown_behavior = "stop"

  monitoring = false

  iam_instance_profile = var.profile_name

  root_block_device {
    volume_type = "gp3"
    volume_size = var.volume_size
    encrypted   = true
  }

  user_data = data.template_cloudinit_config.ec2.rendered

  tags = merge(local.common_tags, {
    Name = format("%s-%s", local.name_prefix, var.name)
  })
}
We start from aws_instance resource. The 1st thing is ami (Amazon Machine Image). And here better to choose so called ECS optimized images. You may read more about it here. First of all such an image already has a pre-installed ecs agent, and at second it is already oprimized for ECS. There is a table, where you can find ami id according to your region. Next you can see already familiar things from the bastion article: that is the instance type, ssh key name and all things related to the network, termination behavior. It is completely the same. We also don’t need detailed monitoring for learning purpose. And then there is the line related to the instance profile that we already have created at the previous lecture (iam_instance_profile = var.profile_name). At my udemy course I am paying huge attention to the volumes. Unfortunately it would take me too much time to describe all here. If you are interested at it, then, welcome to my course. At terrafrom code example you can see that EBS would be used as storage for our Elasticsearch data.
But that all was only the tip of the iceberg. A lot of magic happens during instance initialization at users custom data which is rendered from template. Let’s open that template at ecs-ec2/templates/userdata.sh.tpl:
Content-Type: multipart/mixed; boundary="==BOUNDARY=="
MIME-Version: 1.0

--==BOUNDARY==
Content-Type: text/cloud-boothook; charset="us-ascii"

# Set Docker daemon options
cloud-init-per once docker_options sed -i '/^OPTIONS/s/"$/ --storage-opt dm.basesize=25G"/' /etc/sysconfig/docker

--==BOUNDARY==
Content-Type: text/x-shellscript; charset="us-ascii"

#!/bin/bash
sudo yum update
sudo yum install awscli -y
export AWS_REGION=$(curl -s http://169.254.169.254/latest/dynamic/instance-identity/document | grep region | awk -F\" '{print $4}')
export HOST_NAME=$(aws ec2 describe-tags --region=$AWS_REGION --filters "Name=resource-id,Values=$(curl -s http://169.254.169.254/latest/meta-data/instance-id)" "Name=key,Values=Name" --output=text | cut -f 5)
sudo hostnamectl set-hostname $HOST_NAME


echo 'ECS_CLUSTER=es-cluster' > /etc/ecs/ecs.config
sudo sysctl -w vm.max_map_count=262144
sudo sysctl -w fs.file-max=65536
sudo mkdir -p /usr/share/elasticsearch/data
sudo mkdir -p /usr/share/elasticsearch/config
sudo touch /usr/share/elasticsearch/config/elasticsearch.yml
cd /usr/share/elasticsearch/config

echo cluster.name: \"elasticsearch\" >> elasticsearch.yml
echo node.roles: [ master ] >> elasticsearch.yml
echo node.name: $HOST_NAME >> elasticsearch.yml
echo cluster.initial_master_nodes: aws-es-devops-dev-app-a, aws-es-devops-dev-app-b, aws-es-devops-dev-app-c >> elasticsearch.yml
echo bootstrap.memory_lock: true >> elasticsearch.yml
echo network.host: 0.0.0.0 >> elasticsearch.yml
echo cloud.node.auto_attributes: true >> elasticsearch.yml
echo discovery.seed_providers: ec2 >> elasticsearch.yml
echo network.publish_host: _ec2_>> elasticsearch.yml
echo transport.publish_host: _ec2_ >> elasticsearch.yml
echo transport.port: 9300 >> elasticsearch.yml
echo http.port: 9200 >> elasticsearch.yml
echo discovery.ec2.endpoint: ec2.eu-central-1.amazonaws.com >> elasticsearch.yml
echo discovery.ec2.availability_zones: eu-central-1a,eu-central-1b,eu-central-1c >> elasticsearch.yml
echo cluster.routing.allocation.awareness.attributes: aws_availability_zone >> elasticsearch.yml
echo discovery.ec2.tag.Elastic: \"node\" >> elasticsearch.yml
echo s3.client.default.endpoint: s3.eu-central-1.amazonaws.com >> elasticsearch.yml


sudo chown -R 1000.1000 /usr/share/elasticsearch/data/
sudo chown -R 1000.1000 /usr/share/elasticsearch/config/


--==BOUNDARY==--
The syntax provided above is called cloud-init package stuff. Information about cloud init – you can find here at official aws documentation. There is also rather short and clear instruction here at aws blog.
In short, cloud init is a mechanism that allows us to apply any custom logic before an instance would be run. And there is one thing that we have to do. We will often need to expand the root device size volume for production – here you already see how to do it – using root_block_device. Unfortunately, docker daemon will not see any extra space out of the box and it means that our ES instance will not see it properly also. That is why we need to customize it. And we can do it only before the instance is launched. In fact that is the only way we can apply changes we need. Here I used a hardcoded value at 25GB, as I plan to use volumes with 30GB. It is for sure possible to calculate it dynamically – but I decided not to spend my time on that.
Now let’s go further. At every instance we install aws cli which is used to get hostname. As you already noticed, getting such information is very very tricky. The 169.254.169.254 IP address is a “magic” IP in the cloud world, in AWS it is used to retrieve user data and instance metadata specific to an instance. It can only be accessed locally from instances and available without encryption and authentication. At first we are getting an AWS region. Next using ec2 api we get different ec2 instance metadata, where we cut the tag “name”. We define that tag at terraform code above – and that we want to set as hostname. If you are interested in details how all that bash magic works – then, welcome to my course, where I am explaining all it at console step by step.
That is how it appears we do not get the random AWS indentificator for instance’s hostanme – but our custom hostnames e.g aws-es-devops-dev-app-a. Moreover, we also will use hosname value for our node name. And that is how we build our elasticsearch configuration file on the fly at user data from the terraform side.
There are several more essential details here. That is the place where we define the vm_max parameter, which we were already speaking about at the beginning of the current tutorial. Another essential thing which I mentioned is that “While deploying EC2 we have to declare a special custom data for every instance – that will allow ECS agent to register every EC2 instance to ECS cluster”. Here is that special custom information – ECS_CLUSTER=es-cluster – in fact we have to declare only one parameter – ECS_CLUSTER, which should be equal to the ecs cluster name. Now, when we have all that magic behind us, let’s open implementation:
terraform {
  backend "s3" {
    bucket         = "terraform-state-aws-es-devops"
    dynamodb_table = "terraform-state-aws-es-devops"
    encrypt        = true
    key            = "dev-ec2-ecs.tfstate"
    region         = "eu-central-1"
  }
}

data "terraform_remote_state" "network" {
  backend = "s3"

  config = {
    bucket = "terraform-state-aws-es-devops"
    key    = "dev-network.tfstate"
    region = var.region
  }
}

data "terraform_remote_state" "iam" {
  backend = "s3"

  config = {
    bucket = "terraform-state-aws-es-devops"
    key    = "dev-iam-profile-ecs.tfstate"
    region = var.region
  }
}

provider "aws" {
  allowed_account_ids = [var.account_id]
  region              = var.region
}

module "ecs-ec2" {
  for_each = {
    app-a = {
      private_ip           = "172.27.72.50",
      az                   = "eu-central-1a",
      instance_type        = "t3a.small",
    },
    app-b = {
      private_ip           = "172.27.72.100",
      az                   = "eu-central-1b",
      instance_type        = "t3a.small"
    },
    app-c = {
      private_ip           = "172.27.72.150",
      az                   = "eu-central-1c",
      instance_type        = "t3a.small"
    },
  }

  source = "../../modules/ecs-ec2"

  account_id = var.account_id
  env        = var.env
  project    = var.project
  region     = var.region

  private_ip           = each.value.private_ip
  volume_size          = 30
  key_name             = "dev-ec2-2"
  instance_type        = each.value.instance_type
  az                   = each.value.az
  image_id             = "ami-06d365907eec04148"
  name                 = each.key

  profile_name = data.terraform_remote_state.iam.outputs.profile_name
  sg      = data.terraform_remote_state.network.outputs.sg_app
  subnets = data.terraform_remote_state.network.outputs.subnets_private
}
As always we define our remote state. We will use IAM remote state for getting ec2 instance profile and network remote state for getting security groups and subnets info. Then we have the list of instances. For every instance we define its type, availability zone and private ip address. Then we loop over the current list and use our ecs-ec2 terraform module for every item.
Ok, great. Now we are ready to configure our ecs cluster that will use our ec2 instances as an infrastructure for deploying docker containers with Elasticsearch. See you in the next article.
Of course, there much more different terrafrom files, but they are mostly supplementary. To make current article clean and readable I am not going to provide it here. In case you want to download all terraform modules with all files in easy and simple way – welcome to my course at udemy :). As the reader of that blog you are also getting possibility to use coupon for the best possible low price.