Hi, Elasticsearch fans. At previous article we discussed AWS ECS base components and architecture scheme, at current one – we will create a Elasticsearch Docker file, build from it the image and push it to the AWS docker registry. Let’s start from the screen with physical file’s structure of the part project related to Docker file:
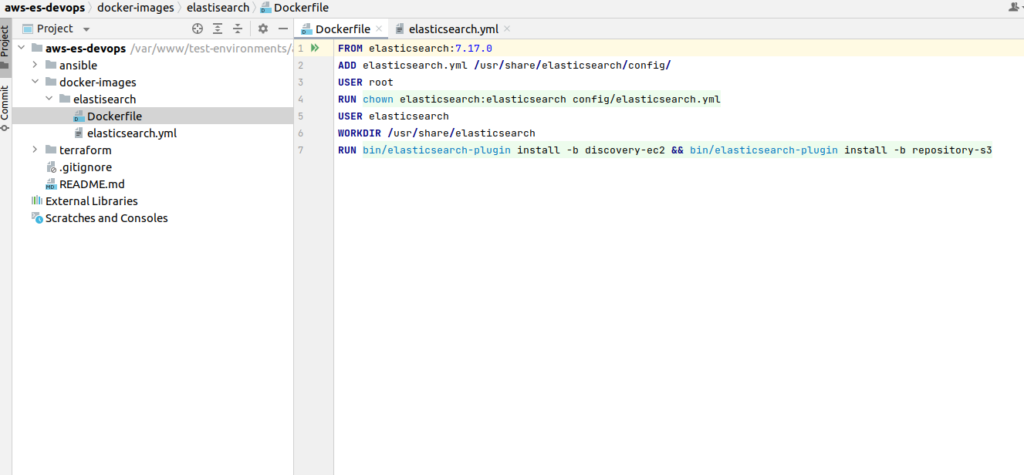
There is a docker-images folder at the root of the project. While expanding it and visiting inside the elasticsearch folder, you will find Dockerfile with a next content:
FROM elasticsearch:7.17.0
ADD elasticsearch.yml /usr/share/elasticsearch/config/
USER root
RUN chown elasticsearch:elasticsearch config/elasticsearch.yml
USER elasticsearch
WORKDIR /usr/share/elasticsearch
RUN bin/elasticsearch-plugin install -b discovery-ec2 && bin/elasticsearch-plugin install -b repository-s3
First of all you have to notice that I am using the base Elasticsearch image for the last 7th edition. I assume that many readers are aware that we already have the 8th edition of Elasticsearch. So you may ask why we can’t use the last Elasticsearch edition? Within that article I am showing you things that were tested at commercial production life. Unfortunately I still did not have the occasion to work with 8th Elasticsearch edition at production, that is why I am not showing it within the article, As I simply can’t guarantee that all would be working. I can tell you more – that if you will try to simply change it here version by yourself at e.g 8.0.0 or higher – for sure nothing will be working for you. The deal is that the security option is forced from the 8th version. Now encryption between nodes and encryption at the REST API layer is required. And it complicates life a lot. Please, have a look here and compare docker compose cluster configuration for 7th version with 8th edition. In fact you have to create and manage the whole certificate eko system by itself. You still will not find a lot of materials on the internet on how to deal with all that security stuff.
But if you are obligated to use the 8th version I can give you several recommendations:
- Read all articles related at how deploy HA Elasticsearch at AWS ECS with 7th version and only then try to switch to 8th edition by yourself
- Consider if you need all that security at all. From my opinion when Elasticsearch nodes are encapsulated at AWS private network, there is no big sense in adding encryption between them and HTTPS from REST API side can be reached by using simply proxy like Nginx or AWS ALB. If above mentioned arguments are acceptable – then try to use 8.x edition with xpack.security.enabled=false. In such a scenario all should be working without any additional changes.
- In case you need Elasticsearch security options to be enabled – extend configuration with security properties according to the documentation. You may try to manage certificate’s creation/propagation at user data EC2 layer (we will speak about it at next articles related to current theme also) using some shared storage, e.g S3. Eventually you may enroll at my udemy course “Elasticsearch as you have never known it before“, which was recently updated (May 2023) with lectures at how to use Elasticsearch 8 with docker locally and how to integrate Elasticsearch 8 with popular programming languages and frameworks. You also may check my course “AWS devops: ElasticSearch at AWS with terraform and ansible” at updates. Suppose I will extend it with Elasticsearch 8 material also.
It was a small digression from the main theme, sorry for that – but I simply had to explain everything. Ok, let’s return to our docker file. So we are using the last 7th Elasticsearch base image. Then we add our configuration, set permissions and workdir. And the last line is essential and rather interesting. It is related to bootstrapping the ES cluster. The discovery-ec2 plugin allows Elasticsearch to find the master-eligible nodes in a cluster running on AWS EC2 by querying the AWS API for the addresses of the EC2 instances running these nodes. If you don’t want to invent a bicycle – I for sure recommend to install that plugin. There is also one more useful plugin – that is repository-s3 – it will allow you to use AWS S3 as a repository for making ES snapshots – so in such a way you can create backups, cool isn’t it?
Ok, now let’s open our Elasticsearch configuration file. That is a very essential part, so please, be attentive here.
cluster.name: "elasticsearch"
#node.name:
cluster.initial_master_nodes: aws-es-devops-dev-app-a, aws-es-devops-dev-app-b, aws-es-devops-dev-app-c
bootstrap.memory_lock: true
network.host: 0.0.0.0
transport.port: 9300
http.port: 9200
cloud.node.auto_attributes: true
cluster.routing.allocation.awareness.attributes: aws_availability_zone
discovery.seed_providers: ec2
network.publish_host: _ec2_
transport.publish_host: _ec2_
discovery.ec2.endpoint: ec2.eu-central-1.amazonaws.com
discovery.ec2.availability_zones: eu-central-1a,eu-central-1b,eu-central-1c
discovery.ec2.tag.Elastic: "node"
s3.client.default.endpoint: s3.eu-central-1.amazonaws.com

#https://www.elastic.co/guide/en/elasticsearch/reference/current/modules-node.html
cluster.name property is required – you may call it whatever you want. node.name is also required, and you may wonder – why it is commented at all. The deal is that we will have to set it dynamically. We are going to deploy 3 node cluster using 3 EC2 instances, every instance has its own hostname. In our case all 3 Elasticsearch nodes are data and master nodes at the same time, so in fact we have a whole list of node names represented at cluster.initial_master_nodes. But we don’t know the exact hostname at the stage of building the docker image. Container will get that info only after it would be run at the EC2 instance. I can tell you even more – we will build the whole Elasticsearch configuration file dynamically. That one file could be absent at all – generally I left it only for convenience of explanations.
The only thing that you already have to take into consideration at that moment – such a big red lamp already should fire up at your head – is that Elasticsearch requires differentiation from us while ECS does not like differentiation. You will see it soon that is create a lot of problems -> that, in result, requires from devops side a lot of workarounds and brings some unpleasant limitations.
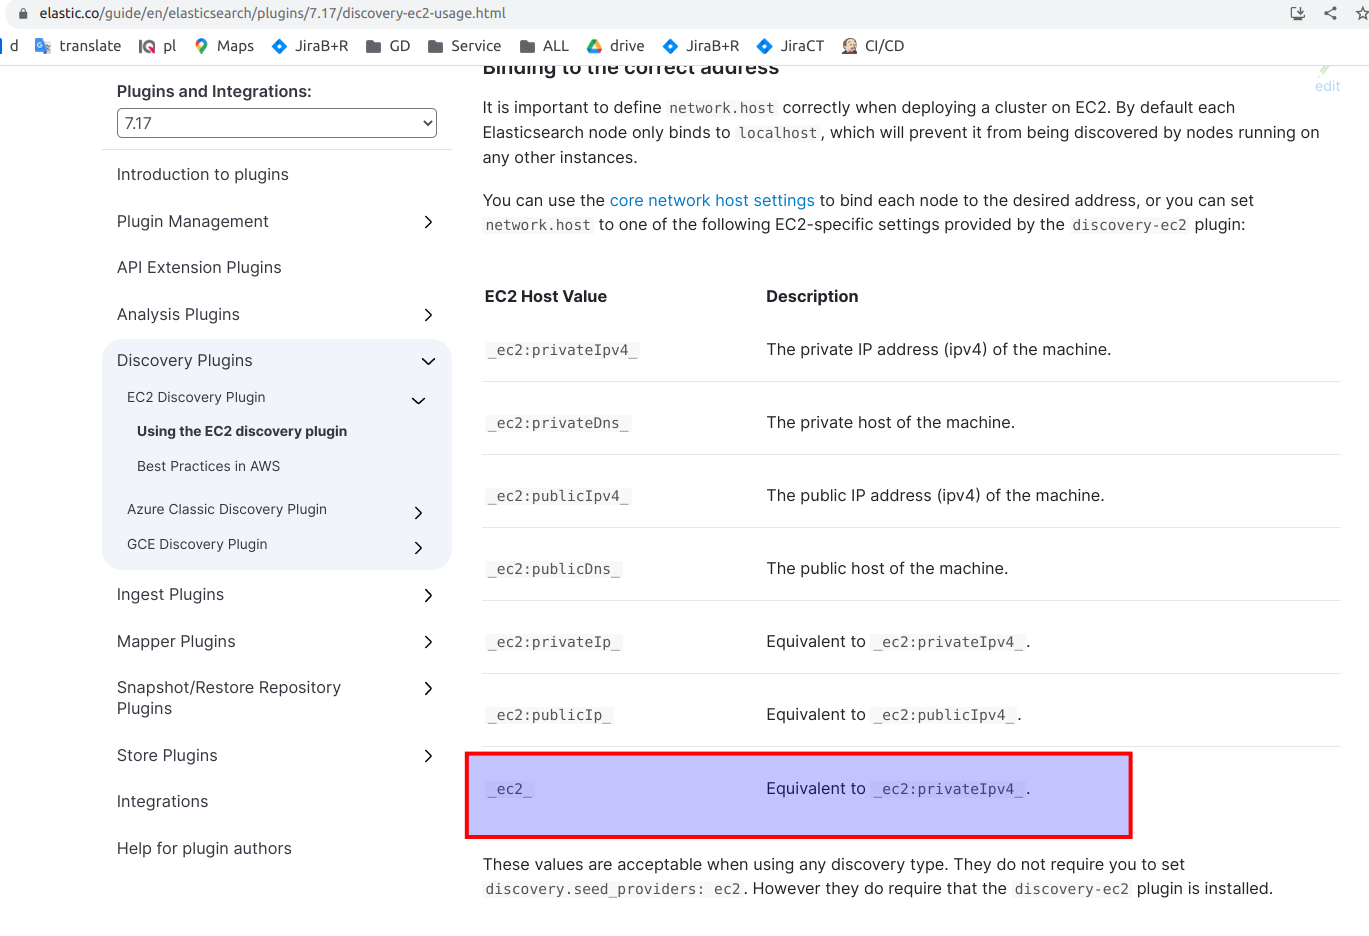
Ok, let’s continue with our Elasticsearch configuration: so next we have classical bootstrap.memory_lock set to true – which prevents JVM from using swap, then we allow Elasticsearch server to bind to all network interfaces on the system. – line network.host: 0.0.0.0. After that we have standard parameters that define port for communication between nodes and port that should be exposed for REST API (lines transport.port: 9300, http.port: 9200). Those are typical parameters you probably met many times. Next parameters are related to the ec2 plugin. In order to enable the automatic definition of the AWS_availability_zone attribute we have to set the next 2 parameters (cloud.node.auto_attributes, cluster.routing.allocation.awareness.attributes) as it is described in the documentation. Then we must use discovery.seed_providers and set it to ec2 value – otherwise the ec2 plugin simply will not work at all. And after that we provide some magic with network and transport hosts (properties network.publish_host and transport.publish_host). You may ask what that _ec2_ means. In fact that magic string is resolved to a private instance IP address by Elasticsearch ec2 plugin. Here is the table from documentation that explains it.
In addition we have to provide discovery.ec2.endpoint value. We also may provide availability zones and tags for ec2 instances that identify our masters. It is not required but helps ec2 plugin to provide bootstrapping of Elasticsearch cluster faster. You may have e.g 10-15 nodes at Elasticsearch cluster and only 3 of them would be masters. So you can tag that nodes separately, e,g using “master” tag or “node” as we have it here – that for sure will speed up bootstrapping time. The last one property s3.client.default.endpoint related to the s3 plugin.
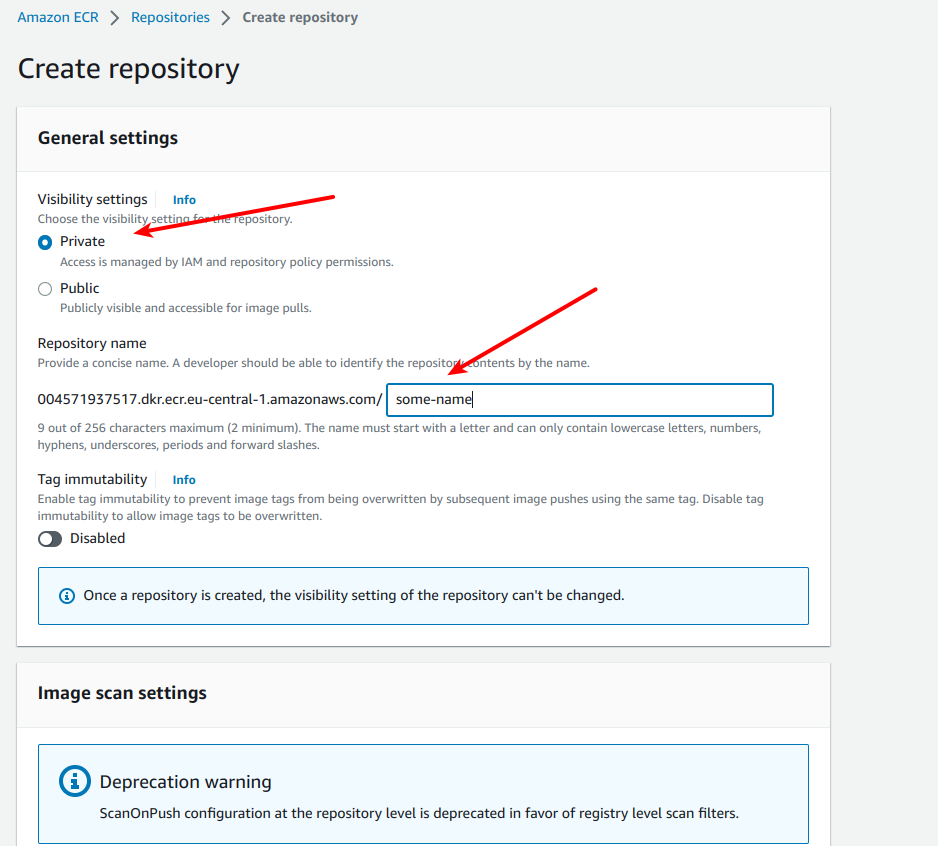
Ok, now let’s proceed with exact instructions on how to build docker image and how to push it to Amazon Elastic Container Registry – ECR. First of all you need to create some private repository at ECR, so visit your AWS account, find AWS Container Registry service and click at “Create repository” button as displayed at screen
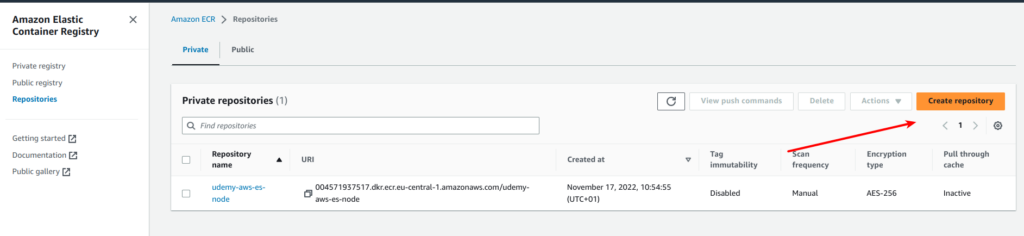
You have to see the next form – please name your repository:
Now you have to login to your repository from your PC. We will use AWS command line for that purpose. Expose your AWS profile, then go to the docker-images/elastisearch/ folder and use next command:
docker login -u AWS -p $(aws ecr get-login-password --region ${REGION}) ${ACCOUND_ID}.dkr.ecr.${REGION}.amazonaws.comReplace REGION and ACCOUND_ID with your values. You final query should like something like that:
docker login -u AWS -p $(aws ecr get-login-password --region eu-central-1) 004571937517.dkr.ecr.eu-central-1.amazonaws.com
In case you have done all properly, then you should see “Login Succeeded” confirmation message at your terminal, which mean that you logged at AWS ECR repository. Then apply next command to build the docker image:
docker build . -t ${ACCOUNT_ID}.dkr.ecr.${REGION}.amazonaws.com/${REPO_NAME}:latestFinally you can push the image to the repository with next command:
docker push ${ACCOUNT_ID}.dkr.ecr.${REGION}.amazonaws.com/${REPO_NAME}:latestAfter that you should see your docker image at AWS management console like it is displayed at screen below:
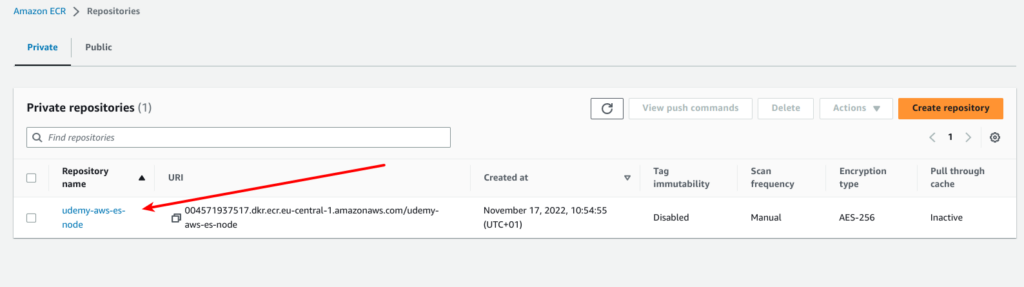
My congratulations – we already have the docker image for deploying Elasticsearch cluster at ECS. So, great, now we are ready to dive deeply into terrafrom. See you in the next article.
New articles would be added gradually, so if you are interested at current topic, please visit that page regularly or subscribe to my newsletter. But if you are not ready to wait – then I propose you to view all that material at my on-line course at udemy. Below is the link to the course. As the reader of that blog you are also getting possibility to use coupon for the best possible low price.