Hi, and welcome to the 3d part of detailed tutorial at how to deploy web application at AWS Fargate using terraform. At 1s 2 parts (part1, part2) we created all required stuff related with AWS network and ALB. Finally we reached our main destination – AWS Fargate terraform module by itself. Here is module files physical structure:
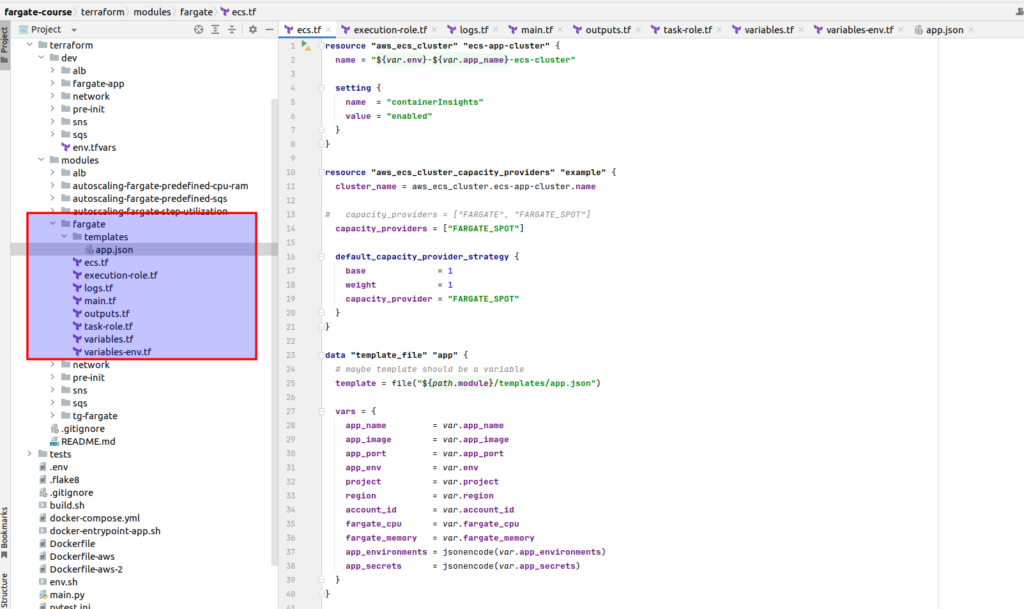
If you are not still comfortable with all AWS Fargate base conceptions, e.g cluster, service, task, capacity provider – it is that time when you should refresh you knowledge. Here is the link to according article. Let’s start from ecs.tf file, where the main logic is located:
# ecs.tf

resource "aws_ecs_cluster" "ecs-app-cluster" {
  name = "${var.env}-${var.app_name}-ecs-cluster"

  setting {
    name  = "containerInsights"
    value = "enabled"
  }
}

data "template_file" "app" {
  # maybe template should be a variable
  template = file("${path.module}/templates/app.json")

  vars = {
    app_name         = var.app_name
    app_image        = var.app_image
    app_port         = var.app_port
    app_env          = var.env
    project          = var.project
    region           = var.region
    account_id       = var.account_id
    fargate_cpu      = var.fargate_cpu
    fargate_memory   = var.fargate_memory
    app_environments = jsonencode(var.app_environments)
    app_secrets      = jsonencode(var.app_secrets)
  }
}

resource "aws_ecs_task_definition" "app" {
  family                = var.app_name
  container_definitions = data.template_file.app.rendered

  requires_compatibilities = ["FARGATE"]
  network_mode             = "awsvpc"
  cpu                      = var.fargate_cpu
  memory                   = var.fargate_memory

  runtime_platform {
    operating_system_family = "LINUX"
    # Available X86_64, ARM64; ARM64 - much more cheaper option, especially if take saving compute plan
    cpu_architecture = var.runtime_platform
  }

  # role that the Amazon ECS service and the Docker daemon can assume
  execution_role_arn = aws_iam_role.ec2_ecs_execution_role.arn

  # role that allows your Amazon ECS container task to make calls to other AWS services
  task_role_arn = aws_iam_role.ecs_task_role.arn
}

resource "aws_ecs_service" "ecs-app-service" {
  name                   = "${var.env}-${var.app_name}-fargate-service"
  cluster                = aws_ecs_cluster.ecs-app-cluster.id
  task_definition        = aws_ecs_task_definition.app.arn
  desired_count          = var.app_count

  # capacity_provider_strategy {
  #   capacity_provider = "FARGATE_SPOT"
  #   weight = 1
  # }

  capacity_provider_strategy {
    capacity_provider = "FARGATE_SPOT"
    weight = 2
  }

  capacity_provider_strategy {
    capacity_provider = "FARGATE"
    weight = 1
    base   = 1
  }

  enable_execute_command = true

  network_configuration {
    security_groups  = [var.fargate_ecs_task_sg.id]
    subnets          = var.fargate_subnets[*].id
    assign_public_ip = true
  }

  load_balancer {
    target_group_arn = var.tg_arn
    container_name   = var.app_name
    container_port   = var.app_port
  }

  depends_on = [var.listener_443_arn]
}
So, at 1st we define our ECS cluster. Then we define a template file with the task definition. We will return to it a little bit later. Below template part we have the task definition terraform resource by itself, where we are saying that we want to use the template already mentioned above. We inform ECS that we want to run our task at Fargate launch type. Then we need to set network mode. It is possible to speak about the ECS network several hours, and it is definitely not possible to put it at one article, If you are interested about details – please, visit my udemy course “AWS Fargate DevOps: Autoscaling with Terraform at practice“. Trying to be as laconic as possible, I can add only, that in case Fargate, awsvpc is the only one available option. Below you may find some explanation of what it means:
awsvpc network mode – it is when each container gets its own network interface. This means they have their own private IP address, just like an independent virtual machine would. This makes it easier to manage and secure each container because they can be treated like individual units with their own IPs. architecture.
So, let’s continue – at aws_ecs_task_definition we also define:
- memory and cpu constraints for our task.
- runtime_platform – here we need to choose an operating system – in our case it is linux, and cpu architecture. From 1st glance it is small thing – but in practice it has a very big impact. I am telling about more about it at article devoted to Fargate cost’s optimizations
There are two essential IAM roles that you need to understand to work with AWS ECS. AWS differentiates between a task execution role, which is a general role that grants permissions to start the containers defined in a task, and a task role that grants permissions to the actual application once the container is started. Let’s dive deeper into what both roles.
So, the 1st one – it is execution_role_arn. This role is not used by the task itself. As you can notice, I left the comment: “role that the Amazon ECS service and the Docker daemon can assume”. So, in fact, it is used by the ECS and container runtime environment to prepare the containers to run. Now let’s open execution-role.tf :
# execution-role.tf

resource "aws_iam_role" "ec2_ecs_execution_role" {
  name               = "fargate-ecs-execution-role"
  path               = "/"
  assume_role_policy = data.aws_iam_policy_document.ec2_ecs_execution_policy.json
}

data "aws_iam_policy_document" "ec2_ecs_execution_policy" {
  statement {
    actions = ["sts:AssumeRole"]

    principals {
      type        = "Service"
      identifiers = ["ecs-tasks.amazonaws.com"]
    }
  }
}

resource "aws_iam_role_policy_attachment" "ec2_ecs_execution_role_attachment" {
  role       = aws_iam_role.ec2_ecs_execution_role.name
  policy_arn = "arn:aws:iam::aws:policy/service-role/AmazonECSTaskExecutionRolePolicy"
}

resource "aws_iam_policy" "ssm_params_policy" {
  name   = "ssm-params-policy"
  policy = <<EOF
{
  "Statement": [
    {
     	"Effect": "Allow",
     	"Action": [
          	 "ssm:GetParameters"
     	],
    	"Resource": [
            "arn:aws:ssm:${var.region}:${var.account_id}:parameter/${var.project}/${var.env}/${var.app_name}/*"
        ]
    }
  ],
  "Version": "2012-10-17"
}
EOF
}

resource "aws_iam_role_policy_attachment" "ssm_params_policy_attachment" {
  role       = aws_iam_role.ec2_ecs_execution_role.name
  policy_arn = aws_iam_policy.ssm_params_policy.arn
}
Here we allow “assuming” action, and then we tell what exactly we allow to “assume” – in that case we allow access to ecs tasks service. Then a predefined AWS role is used, which is called AmazonECSTaskExecutionRolePolicy. It describes what exactly do we allow: communicate with aws docker registry and gives us the possibility to expose logging information – and in our case it is almost enough. (If you are interested at what is “assume” role policy means – please, refer to the next article). One more thing is missing only – it is access to SSM, where we will store some sensitive vars for our application. So, we are adding according permissions.
The 2d one role is task_role_arn. It grants additional AWS permissions required by your application once the container is started. Let’s open task-role.tf where we define all things related to current role.
# task-role.tf

resource "aws_iam_role" "ecs_task_role" {
  name               = "fargate-ecs-task-role"
  path               = "/"
  assume_role_policy = data.aws_iam_policy_document.ecs_task_policy.json
}

data "aws_iam_policy_document" "ecs_task_policy" {
  statement {
    actions = ["sts:AssumeRole"]

    principals {
      type        = "Service"
      identifiers = ["ecs-tasks.amazonaws.com"]
    }
  }
}

resource "aws_iam_policy" "ecs_exec_policy" {
  name   = "ecs-exec-policy"
  policy = <<EOF
{
  "Statement": [
    {
     	"Effect": "Allow",
     	"Action": [
          	"ssmmessages:CreateControlChannel",
          	"ssmmessages:CreateDataChannel",
          	"ssmmessages:OpenControlChannel",
          	"ssmmessages:OpenDataChannel"
     	],
    	"Resource": "*"
    }
  ],
  "Version": "2012-10-17"
}
EOF
}

resource "aws_iam_role_policy_attachment" "ecs_exec_policy_attachment" {
  role       = aws_iam_role.ecs_task_role.name
  policy_arn = aws_iam_policy.ecs_exec_policy.arn
}
Here is already familiar for you assume part. And then we have much more interesting thing related to the ECS exec mechanism – it is used to get a shell to a container running at Fargate. Very useful thing for debugging. Task role – that is the place, where you need to add also all other permissions your application requires, e.g SQS or S3. More examples, the same as detailed instructions at how to use ECS exec mode to enter inside Fargate docker container, you may find at my udemy course “AWS Fargate DevOps: Autoscaling with Terraform at practice“.
Ok, so suppose roles issues can be considered to be closed. Let’s go to the next block. It is the definition of ECS service. So we set the cluster name, then we pass cluster and task definition references. After that, there are:
- the desired count property, which means the number of tasks to place and keep running;
- several code blocks related to capacity providers. If you are interested at details – please refer yo my article: “AWS Fargate cost optimization by using Spot instances“
- enable_execute_command, which means whether to enable Amazon ECS Exec for the tasks within the service.
- network configuration block – here we pass subnets where we want our tasks to be running, security group and assign_public_ip
- load balancer block – as you remember from our architecture scheme, we need to connect load balancer with our application, which is running at AWS Fargate. To do it, we need to define target group (TG) – and that block is the “glue”, that connects all at one working structure – load balancer, TG and our application.
Several essential words about assign_public_ip parameter:
- Public Access: If assign_public_ip is set to true, the tasks in your ECS service will have public IP addresses, making them accessible over the internet (assuming security groups allow it).
- Private Access: If assign_public_ip is set to false, the tasks will only have private IPs, meaning they can only be accessed within the VPC or through other networking configurations such as VPNs or Transit Gateways.
- Security Considerations: Assigning public IPs can be convenient if you need direct access to the tasks from the internet, but it also poses security risks. You should ensure proper security groups and network ACLs are in place to protect your services.
Now let me provide task definition template:
# app.json
[
  {
    "name": "${app_name}",
    "image": "${app_image}",
    "memory": ${fargate_memory},
    "cpu": ${fargate_cpu},
    "networkMode": "awsvpc",
    "logConfiguration": {
      "logDriver": "awslogs",
      "options": {
        "awslogs-group": "${app_env}-${app_name}-log-group",
        "awslogs-region": "${region}",
        "awslogs-stream-prefix": "${app_env}-${app_name}-log-stream"
      }
    },
    "linuxParameters": {
        "initProcessEnabled": true
    },
    "portMappings": [
      {
        "hostPort": ${app_port},
        "containerPort": ${app_port},
        "protocol": "tcp"
      }
    ],
    "healthCheck": {
        "command": [
        "CMD-SHELL",
        "curl -f http://localhost:5000/ping"
        ],
        "interval": 5,
        "timeout": 2,
        "retries": 3
    },
    "environment": ${app_environments},
    "secrets": ${app_secrets},
    "resourceRequirements": null,
    "essential": true,
    "environmentFiles": [],
    "volumesFrom": null,
    "hostname": null,
    "user": null,
    "workingDirectory": null,
    "extraHosts": null,

    "ulimits": [
      {
        "name": "nofile",
        "softLimit": 65536,
        "hardLimit": 65536
      }
    ],
    "dockerLabels": null,
    "dependsOn": null,
    "repositoryCredentials": null
  }
]
Parameter’s explanations from task definition template is out of the scope of current article – as it would be several articles by itself 🙂 If you are interested at details – please, refer to my udemy course “AWS Fargate DevOps: Autoscaling with Terraform at practice“. In fact – you can use it as it is, even without deep understanding of every property, but remember to change health check url according to your application. You may also notice that template is using aws logging at CloudWatch. To be it working we also have to create according AWS resources, which is done at logs.tf file:
# logs.tf

resource "aws_cloudwatch_log_group" "fargate-task-log-group" {
  name              = "${var.env}-${var.app_name}-log-group"
  retention_in_days = 30
}

resource "aws_cloudwatch_log_stream" "fargate-task-log-stream" {
  name           = "${var.env}-${var.app_name}-log-stream"
  log_group_name = aws_cloudwatch_log_group.fargate-task-log-group.name
}
In the end, let me provide classical terraform files:
# outputs.tf

output "ecs_cluster_name" {
  value = aws_ecs_cluster.ecs-app-cluster.name
}

output "ecs_service_name" {
  value = aws_ecs_service.ecs-app-service.name
}

output "app_name" {
  value = var.app_name
}
# variables.tf
variable "app_name" {
type = string
}
variable "app_image" {
type = string
}
variable "app_port" {
type = number
}
variable "app_count" {
type = number
}
variable "fargate_cpu" {
type = number
}
variable "fargate_memory" {
type = number
}
variable "fargate_ecs_task_sg" {
description = "The Fargate ECS task security group"
}
variable "fargate_subnets" {}
variable "tg_arn" {
type = string
}
variable "listener_443_arn" {
type = string
description = "Listener for the TG (443)"
}
variable "runtime_platform" {
type = string
description = "The CPU architecture that ECS tasks run on"
}
variable "app_environments" {
type = list(map(string))
description = "The prefix identifier used when defining resource names"
}
variable "app_secrets" {
type = list(map(string))
description = "The prefix identifier used when defining resource names"
}variables-env.rf, the same as main.tf, are completely the same as we had it at previous parts.
So, we still need to deal with target group and final realization, but let’s do it at next part. If you do not want to miss it, subscribe to the newsletter. If you want to pass all material at once in fast and convenient way, with detailed explanations, then welcome to my course: “AWS Fargate DevOps: Autoscaling with Terraform at practice”, here you may find coupon with discount.