
Hi,
Recently I had an opportunity to make a practical research around AWS Personalize Service. My main goal was to test Personalized-Ranking recipe and to verify how it works in pair with rather fresh AWS feature – OpenSearch Personalize ranking plugin. I had to verify if is possible to bring our existing search system at new level with ML personalizing features. The main thing that I was interested at – if it is possible to use all above mentioned stuff to create personalized search system, which was not clear to the end after reading documentation. It appeared to be an interesting adventure which I decided to share with you.
All started with AWS Personalize documentation, which mostly deserves praise. AWS Personalize propose some pre-ready solutions for e-commerce and films recommendations – but it was not my case, so I had to go further with custom solution. All started from data. I had to prepare 3 next data sets:
- Users – in my case it was represented by service customers that are using search system. I added here different customer’s statistics in addition to the required user_id, which I assumed can be useful
- Items – list of auctions search by customers. Here item_id is required. Though I also added some additional metrics, which could potentially improve ML training results
- Interactions – it is list of different interactions, like customer clicked at auction or leave some message upon it, and so on, with timestamps. In that case user_id, item_id and timestamp are required, Though from practice appeared that it is also worth to add event_type and event_value features – that give much more better results.
While preparing datasets, I’ve met the 1st potentially problematic place – it is restriction at number of features that can be added at users or items dataset. It is limited to 25. But after some conversions with AWS team, it appeared to be not so big problem, as in case of categorical values limitation can be bypassed with using pipe delimiters in the same field, e.g in case user has such categorical features as gender and age range, you should not create separate columns for according parameters – it can be merged at one using next syntax: Man|25
Preparing data – it is always a time consuming process, so it took me some time to do all properly. In the end I uploaded according csv files at S3 bucked and imported according datasets at AWS Personalize. It appeared to be very pleasant ans fast part 🙂 . As second step of ML model building workflow AWS Personalize propose you to analyse data using their special scanner – which is rather useful and worth of doing it.
But it was not the end. Here I had a surprise. It appeared that having data sets is not enough, special scheme should be defined for every dataset. Generally speaking, I understand why it is required, what was hard for me to understand – that is the tool that AWS chosen for that purpose – Avro Schemas. I have never heard about that “tool” at all, as result some time had to be spent to get acquainted with how to build data schemes and what are requirements to data types. Anyway, it was not too complicated.
At next step I had to choose a recipe, which the synonym for some exact ML algorithm. I was interested only at one – Personalized-Ranking recipe. It is hierarchical recurrent neural network (HRNN) that can re-rank results. That is the only model which is supported by OpenSearch Personalize ranking plugin – so I don’t have big problems here at what to choose 🙂
So, I used some default training parameters and run ML learning process, which is called “Create solution”, It took 20 min my model solution to be ready. And the model metrics appeared quite acceptable as at first attempt.
The last step in preparing model workflow – was deploying it with exposing API, which was rather easy to do – it was enough to make several clicks only. So, my POC reranking ML model was ready and I continued with OpenSearch plugin. I had to deploy test OpenSearch cluster, though it was not a problem as I already had according terraform module, which you can find at my course: “AWS devops: ElasticSearch at AWS with terraform and ansible“. After deploying it, I indexed some test data and started to configure the reranking plugin, which appeared to be the worst part of whole research. The main reason here – tangled AWS permissions. I decided to create small diagram – hope it will save your hours in case you would like to use current AWS feature
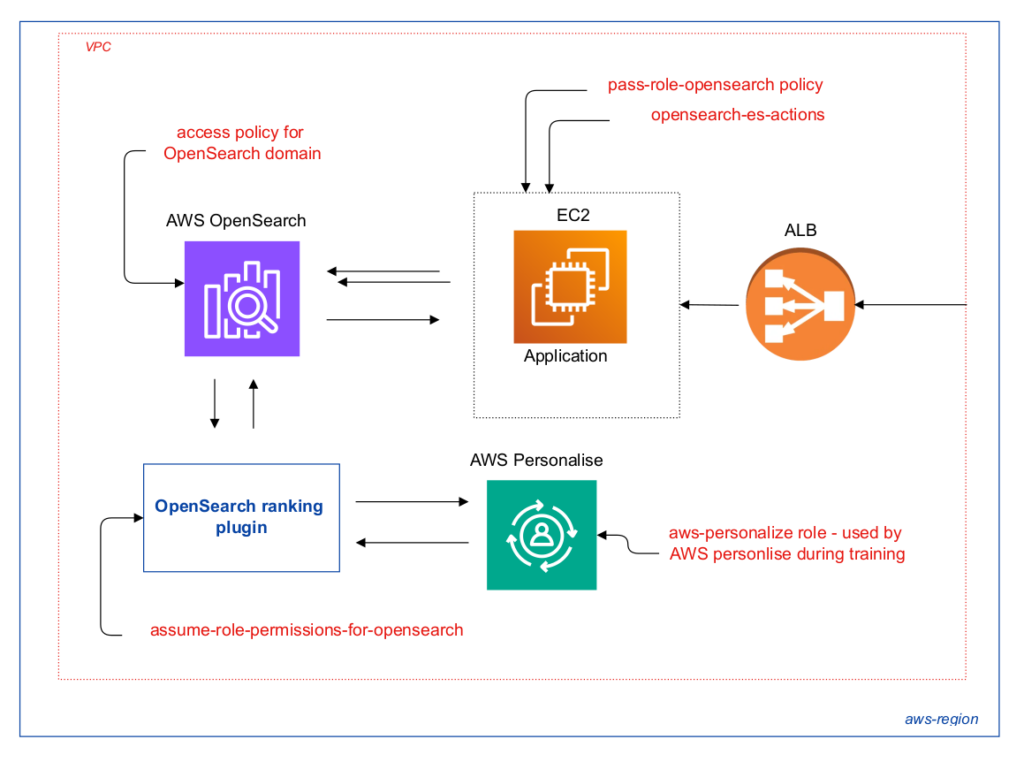
So, I had to prepare:
- aws-personalize role – it is used used by AWS Personalize during training. In that case I attached AWS managed policy AmazonPersonalizeFullAccess, and S3 permissions are also required. Here is according policy I used:
{
    "Version": "2012-10-17",
    "Id": "PersonalizeS3BucketAccessPolicy",
    "Statement": [
        {
            "Sid": "PersonalizeS3BucketAccessPolicy",
            "Effect": "Allow",
            "Action": [
                "s3:GetObject",
                "s3:ListBucket",
                "s3:PutObject"
            ],
            "Resource": [
                "arn:aws:s3:::clicktrans-personalize-data",
                "arn:aws:s3:::clicktrans-personalize-data/*"
            ]
        }
    ]
}
You may read more about it at prerequisites documentation
- assume-role-permissions-for-opensearch – it is used by ranking plugin. You need to add trust policy.
{
    "Version": "2012-10-17",
    "Statement": [
        {
            "Sid": "",
            "Effect": "Allow",
            "Principal": {
                "Service": "es.amazonaws.com"
            },
            "Action": "sts:AssumeRole"
        }
    ]
}
And permissions to use personalized API. Here is the next policy you may use:
{
    "Version": "2012-10-17",
    "Statement": [
        {
            "Effect": "Allow",
            "Action": [
                "personalize:GetPersonalizedRanking"
            ],
            "Resource": "*"
        }
    ]
}- access policy for OpenSearch domain – I will not go in details here a lot, for test purposes I simply allowed all actions at OpenSearch at terraform side
  access_policies = <<CONFIG
{
    "Version": "2012-10-17",
    "Statement": [
        {
            "Action": "es:*",
            "Principal": "*",
            "Effect": "Allow",
            "Resource": "arn:aws:es:${var.region}:${var.account_id}:domain/${var.domain_name}/*"
        }
    ]
}
CONFIG
If you are interested at details – welcome to my course 🙂
- To use the plugin with OpenSearch Service the user or role must have permission to perform according actions. As in my case application was deployed at EC2, I attached next policies at EC2 profile:
– pass-role-opensearch policy:
{
    "Version": "2012-10-17",
    "Statement": [
        {
            "Sid": "",
            "Effect": "Allow",
            "Action": "iam:PassRole",
            "Resource": "arn:aws:iam::{account_id}:role/assume-role-permissions-for-opensearch"
        }
    ]
}
– opensearch-es-actions policy:
{
    "Version": "2012-10-17",
    "Statement": [
        {
            "Action": [
                "es:*"
            ],
            "Effect": "Allow",
            "Resource": "*"
        }
    ]
}
HOLLY MOLLY. I had only one question when it was done. Is it possible to make it even more complicated? 🙂 And it appeared – that YES. To configure plugin a special thing should be done – search pipeline has to be created as described here. While trying to run according script from EC2 it appeared to be not working. The deal is that OpenSearch did not see that request is running from EC2 instance, which indeed has according permissions. I had to sign according request manually. It is only 2 sentences – but it took me 2 hours to debug the problem. So, I had to run next command to get EC2 iam profile name
curl http://169.254.169.254/latest/meta-data/iam/security-credentials/Then I run next thing to get AWS credentials assigned to EC2
http://169.254.169.254/latest/meta-data/iam/{profile_name}Finally I exported according values, that allowed me to run python script
export AWS_ACCESS_KEY_ID=xxx
export AWS_SECRET_ACCESS_KEY=xxxx
export AWS_SESSION_TOKEN=xxxx
export AWS_DEFAULT_REGION=xxx
But it was not the end. Current article already appeared to be long, so I will continue at next part.. You may also subscribe to my newsletter to be aware of new articles. BR